
Tired of staring at the same four walls? You don’t need a hefty budget or professional help to give your home a fresh, stylish update. With a little creativity and a weekend to spare, these five DIY projects will revitalize your space without breaking the bank. From upcycling thrifted finds to crafting custom décor, we’ve got you covered with simple, transformative ideas that blend functionality and flair. Let’s dive in!
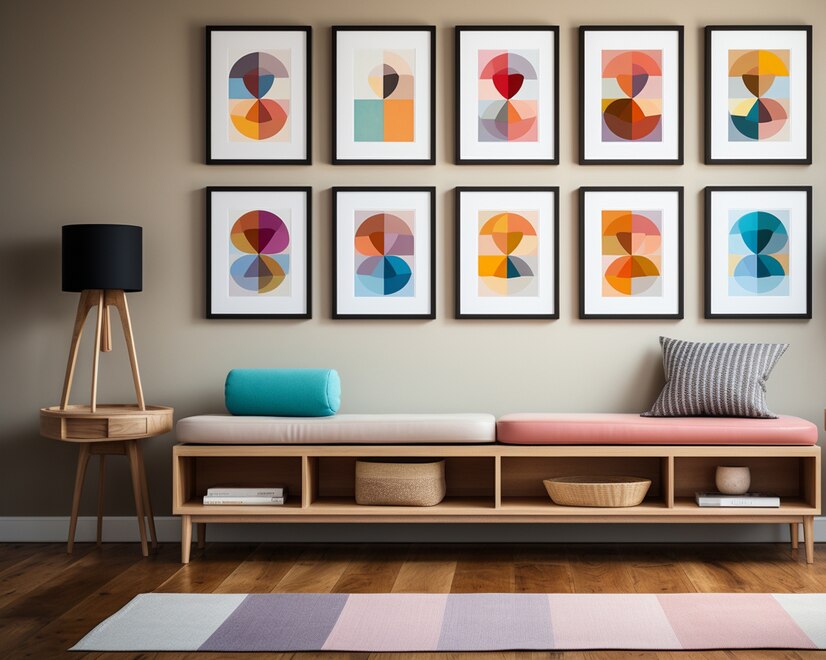
1. Thrifted Frame Gallery Wall & DIY Art Prints
Breathe New Life into Blank Walls
Gallery walls are a timeless way to add personality to any room. Instead of splurging on expensive art, raid your local thrift store for mismatched frames and create your own prints.
Materials You’ll Need:
- Assorted thrifted frames (aim for 5–7 in varying sizes)
- Sandpaper, spray paint, or acrylic paint
- Free printable art (try sites like Unsplash or Etsy) or materials for DIY art (fabric scraps, scrapbook paper, pressed leaves)
- Scissors, glue, and mat board (optional)
- Command strips or nails
Step-by-Step Guide:
- Prep the Frames: Remove glass and backing. Sand wooden frames to remove chipped paint, then spray-paint or hand-paint them in a cohesive color (e.g., matte black, gold, or pastels).
- Create Art: Print free botanical illustrations, vintage maps, or motivational quotes. For a hands-on touch, glue fabric scraps to cardstock or frame pressed flowers between parchment paper.
- Arrange Layout: Lay frames on the floor to experiment with arrangements. Mix horizontal and vertical orientations for visual interest.
- Hang with Precision: Use painter’s tape to mark wall positions. Secure frames with Command strips (rental-friendly) or nails.
Budget Tips:
- Use old calendars, book pages, or fabric swatches as free “art.”
- Repurpose frames from family photos or garage sales (often under $2 each).
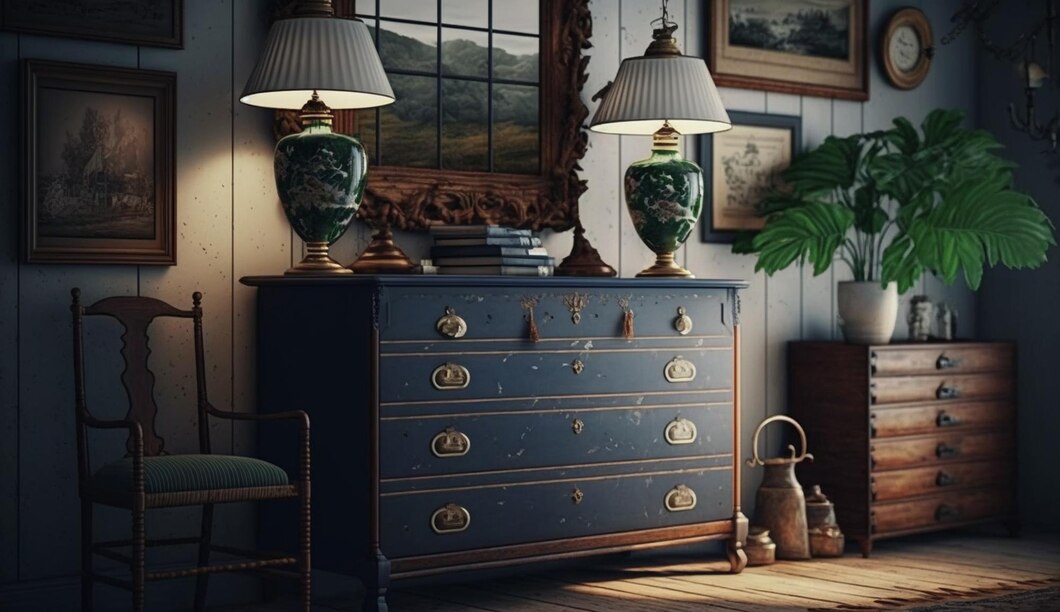
2. Repaint Old Furniture for a Modern Twist
Turn Dated Pieces into Statement Makers
A coat of paint can transform a tired dresser, side table, or bookshelf into a focal point. Opt for bold hues or soft neutrals to match your room’s vibe.
Materials You’ll Need:
- Furniture piece (sandpapered and cleaned)
- Primer (for dark wood or laminate)
- Chalk paint or latex paint
- Paintbrushes, foam rollers, or spray paint
- Protective finish (wax or polyurethane)
- New knobs or handles (optional)
Step-by-Step Guide:
- Prep the Surface: Sand rough areas and wipe away dust. Apply primer if needed (especially for laminate).
- Paint: Use a brush for edges and a roller for flat surfaces. Apply 2–3 thin coats, drying between layers.
- Add Details: Paint drawers or shelves in contrasting colors. Replace hardware with modern knobs or spray-paint existing ones gold.
- Seal It: Protect with a clear wax or polyurethane finish.
Budget Tips:
- Use leftover paint from previous projects.
- Repurpose old scarves or belts as drawer pulls.
3. No-Sew Throw Pillows with Upcycled Fabrics
Instant Coziness, Zero Sewing Skills Required
Swap out pricey store-bought pillows with custom designs using fabric remnants, old sweaters, or thrifted curtains.
Materials You’ll Need:
- Fabric (1 yard makes 2–4 pillows)
- Scissors, fabric glue, or iron-on hem tape
- Pillow inserts (or repurposed bed pillows)
- Embellishments: tassels, buttons, or stencils
Step-by-Step Guide:
- Cut Fabric: Measure your insert and cut two fabric pieces 1” larger on all sides.
- Glue Seams: Place fabric right-sides together. Use fabric glue or hem tape along three edges. Let dry.
- Insert & Close: Turn the cover right-side out, insert the pillow, and glue the final edge.
- Decorate: Glue on pom-pom trim, stencil geometric patterns, or tie-dye plain fabric.
Budget Tips:
- Use old sweaters for textured, cozy covers.
- Repurpose flour sacks or tea towels for a rustic look.

4. Repurposed Planters for a Green Oasis
Bring the Outdoors In with Creative Containers
Plants add life to any room, but pots can be pricey. Turn household items like mugs, tin cans, or baskets into quirky planters.
Materials You’ll Need:
- Containers: mason jars, tin cans, wooden crates
- Drill (for drainage holes)
- Spray paint or acrylics
- Potting soil and plants (succulents, herbs, or pothos)
Step-by-Step Guide:
- Drill Holes: Carefully drill 1–2 holes in the bottom of metal or ceramic containers.
- Decorate: Paint cans with polka dots or ombre effects. Wrap baskets with ribbon.
- Plant: Add pebbles for drainage, then soil and plants.
Budget Tips:
- Propagate free plants from friends (snip a pothos vine and root it in water).
- Use cracked mugs or chipped bowls from thrift stores.
5. DIY Accent Lighting on a Dime
Set the Mood with Custom Light Fixtures
Upgrade basic lampshades or string lights with simple tweaks for a warm, inviting glow.
Materials You’ll Need:
- Plain lampshade or string lights
- Fabric, lace, or adhesive stencils
- Spray paint (for metal bases)
- Glue gun or clips
Step-by-Step Guide:
- Lampshade Makeover: Stretch lace or patterned fabric over a plain shade, securing with glue. For a boho look, wrap with jute rope.
- String Light Upgrade: Clip photos, dried flowers, or origami to string lights with mini clothespins.
- Paint Bases: Refresh old lamps with metallic spray paint.
Budget Tips:
- Use coffee filters dyed with tea for a vintage shade.
- Repurpose mason jars as pendant lights with DIY kits.
Your Home, Your Masterpiece
With these five projects, you can tackle one room or your entire home in a single weekend. The key is to embrace imperfection—DIY is about creativity, not perfection. Share your before-and-after photos online to inspire others, and remember: the best décor tells a story. Now grab your paintbrush and get refreshing!
Final Tips for Success:
- Work in stages: Prep materials Friday night, create Saturday, assemble Sunday.
- Host a DIY swap party to trade unused supplies with friends.
- Always prioritize safety: Ventilate rooms when painting and handle tools carefully.
Your dream space is just a weekend away—no credit card required!